

You reach for your water bottle mid-hike, slide it into the side pocket, and watch it slip right through a torn seam onto the dirt. A blown-out mesh pocket is one of the most common backpack failures, and it always seems to happen when you need that pocket most.
The good news? You don’t need new gear or a repair shop. Most pocket damage comes down to a ripped seam, stretched-out elastic, or a small hole in the mesh, and all of those fix up nicely at your kitchen table.
Learning how to fix backpack water bottle pocket problems takes basic supplies, a little patience, and about half an hour. This guide walks you through every step to repair the tear, restore the stretch, and get your bottle riding securely again.
Why Repairing a Backpack Water Bottle Pocket Matters
That side pocket does more work than you’d think. It holds your hydration within easy reach so you drink often instead of stopping to dig through your main compartment.
For homeowners and renters, a quick fix saves a favorite daypack from the donation pile and keeps a little cash in your pocket. For DIY enthusiasts, the same hand sewing skills carry straight over to jackets, tents, and tote bags.
Campers and outdoor beginners feel it most. A failed backpack side pocket means a bottle bouncing loose on the trail or rolling away down a slope. Reliable hydration access keeps you moving, safe, and comfortable on long days outside. A few minutes of fabric repair now protects your gear, your routine, and your peace of mind every time you head out the door.
Tools and Materials You’ll Need
Gather your supplies before you start, so you’re not hunting for thread halfway through. Most of these items cost little and probably already live in a drawer or a basic sewing kit.
- Heavy-duty thread, like bonded nylon or upholstery thread, for strength
- A sturdy hand-sewing needle sized for tough nylon fabric
- Sharp scissors for trimming frayed threads and mesh
- Replacement elastic binding if the original has lost its stretch
- A mesh or nylon reinforcement patch for backing larger holes
- Straight pins or small clips to hold layers steady
- A lighter to seal cut nylon edges
- A seam ripper to remove old, failed stitching cleanly
- A thimble (optional, but it saves your fingertips when pushing through thick seams)
That thimble is a small comfort that makes a real difference when you’re forcing a needle through doubled-over nylon and dense edge stitching.
Step-by-Step Guide on How to Fix Backpack Water Bottle Pocket
Move through these eight steps in order, and don’t rush the prep work. Clean edges and tidy stitches turn a quick patch into a repair that holds bottle after bottle, trip after trip.
Step 1 – Inspect the Pocket Damage
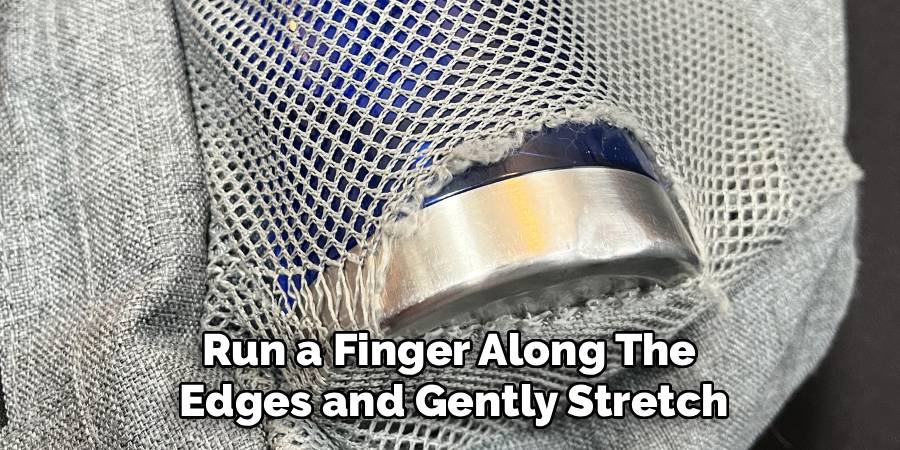
Lay your backpack flat under good light and look closely at what failed. Did the seam pull apart, did the mesh tear open, or has the elastic binding gone slack and loose?
Run a finger along the edges and gently stretch the pocket to find weak spots hiding beneath frayed threads. A clean seam separation usually just needs fresh stitching, while a ragged hole in the mesh pocket calls for a backing patch.
Knowing how to fix backpack water bottle pocket damage starts with this honest look. Match the right method to the actual problem, because guessing wrong means picking out your work and starting over. Spend a minute here, and the rest of the job goes far smoother.
Step 2 – Clean Up the Frayed Edges
Before you stitch anything, tidy the torn area. Use your sharp scissors to trim away loose, fuzzy threads and any shredded bits of mesh hanging off the tear.
Cut carefully and only where needed, since you want neat edges, not a smaller pocket. Pull stray threads gently first to see how far they run before you snip them.
If the pocket uses nylon fabric, pass a lighter flame quickly along the cut edge. You’ll catch that faint plastic scent as the fibers melt into a smooth, firm bead that won’t unravel. Don’t linger, or the material scorches and turns brittle. This clean, sealed edge gives your needle a solid surface and stops the torn seam from creeping open again later.
Step 3 – Remove Old, Failed Stitching
If the original seam tore but the fabric is still healthy, clear out the broken thread first. Slide your seam ripper under the old stitches and lift gently, working along the line until the loose section comes free.
Go slowly so you don’t nick the nylon fabric underneath. Pull the cut threads out with your fingers and brush away the little fuzzy bits that collect along the seam.
You’ll feel the two edges relax and separate cleanly once the old stitching is gone. This fresh, debris-free seam lets your new thread sit flat and grip properly. Skipping this step leaves bumpy old thread in the way, which weakens your repair and makes for an uneven, lumpy finish.
Step 4 – Line Up and Pin the Seam
Now bring the torn edges back together exactly as they sat originally. Match the seam lines and overlap any binding so the pocket keeps its proper shape and depth.
Push straight pins through both layers or snap small clips along the edge to lock everything in place. Nylon is slippery, so loose layers shift the moment your needle pushes through.
Stretch the pocket gently and check that it sits flat without puckering or twisting. Adjust the pins until the edges meet evenly all along the tear. Getting this alignment right now keeps your bottle sitting upright later instead of leaning into a lopsided pouch. Smooth the fabric with your palm and confirm it looks even from both sides.
Step 5 – Stitch the Torn Seam
Thread your needle with about two feet of heavy-duty thread and knot the end firmly. Start from the inside so the knot tucks out of sight.
Sew along the seam with a tight backstitch, looping back over each stitch so the line stays strong under load. Keep your stitches small and even, pulling each one snug without bunching the nylon fabric.
Push the needle slowly through the layers and let your thimble take the pressure on stubborn spots. Run your stitch line a little past each end of the tear, into healthy fabric, so the repair anchors securely. When you finish, knot the thread twice and tuck the tail under the stitches so it can’t work loose on the trail.
Step 6 – Patch a Hole in the Mesh
If the damage is a hole rather than a split seam, back it with a patch. Cut a piece of mesh or nylon reinforcement patch that reaches at least half an inch past the hole on every side, and round the corners so they won’t peel.
Slide the patch behind the damaged area, pin it flat, and stitch around all four edges with small, even passes. The patch spreads stress across a wider surface and stops the hole from growing.
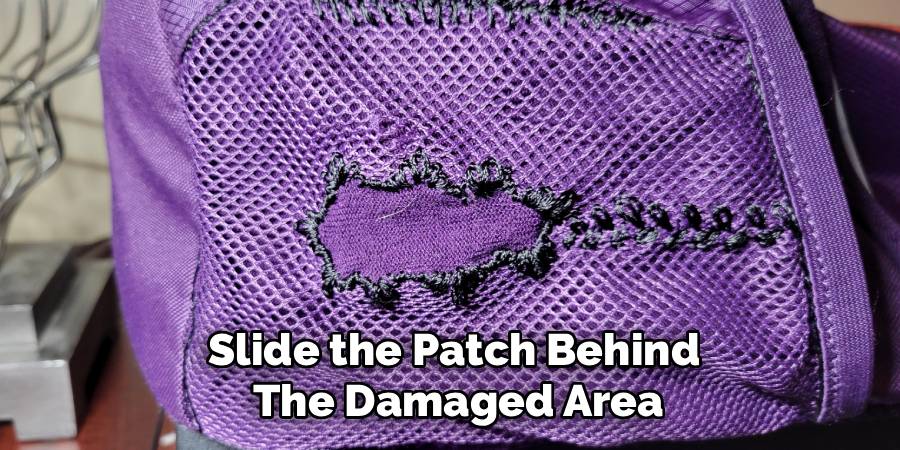
You’ll feel the spot firm up under your fingers as the layers lock together. For a daily-use backpack side pocket, this backing turns a fragile tear into a repair that easily survives years of fabric repair-free service.
Step 7 – Restore the Elastic Binding
A pocket that won’t grip your bottle usually has stretched-out elastic along the top. Snip a few stitches to free a short length of the old elastic binding, then measure a fresh piece slightly shorter so it pulls the opening snug.
Thread the new elastic through the binding channel with a safety pin clipped to one end, guiding it along until it comes out the far side. Stitch both ends down firmly so they can’t slip back inside.
Stretch the opening and let it snap back to test the tension. You want a firm hug that holds your bottle without a fight. This restored stretch panel is what keeps your hydration access secure on bumpy trails.
Step 8 – Test the Pocket With a Full Bottle
Patience pays off at the finish. Before you trust the pocket on a hike, load it with a full water bottle and put it through its paces.
Slide the bottle in and out a few times, feeling for smooth, snug resistance. Then sling the pack on, walk around, and bend, twist, and jog a little to mimic real trail motion.
Run your finger along the seam and patch to confirm the stitches stay tight and flat. If anything slips or stretches, reinforce it now rather than out on the trail. Once the pocket grips firmly through every move, your repair is ready, and your backpack is set for the next adventure with reliable trail gear.
Critical Mistakes to Avoid When Repairing a Backpack Water Bottle Pocket
Even careful beginners trip over a few common traps, so let’s clear them up before you start.
The biggest mistake is reaching for weak, all-purpose thread. It snaps under the constant flex and weight a loaded pocket creates, and your repair fails within a few outings. Always use heavy-duty bonded nylon or upholstery thread that can handle real strain.
Another frequent slip is leaving frayed nylon edges raw. Skip sealing them, and the mesh keeps unraveling until your fresh stitching pulls loose. A quick pass with a lighter melts the fibers and locks them down for good.
Many people also stitch right over old, broken thread instead of removing it first. That leaves lumpy, weak spots and an uneven seam that pulls apart again. Take the extra minute with your seam ripper.
Rushing the alignment causes trouble too. A twisted or puckered seam leaves the pocket lopsided, so your bottle leans and wobbles instead of riding upright. Smooth and pin everything flat before you sew. Finally, don’t replace the elastic with a piece that’s too long. Cut it slightly short so the opening grips firmly, or your bottle slides right back out.
Expert Tips
A few smart habits turn a decent fix into one that lasts for seasons.
First, match your replacement materials to the original. Use mesh for mesh and similar-width elastic binding, so the pocket keeps its shape and stretch instead of feeling stiff or saggy.
Second, copy the factory’s stitch lines. Look at how the manufacturer sewed the other pockets, then mirror that edge stitching and reinforcement where you repair. Their design already survived the testing, so borrow it.
Third, double your stitch line along high-stress edges. The extra pass costs you only a couple of minutes and adds serious durability where the pocket flexes most.
Finally, build outdoor gear maintenance into your routine. Check the seams and elastic before long trips, rinse out grit that grinds the fabric, and seal any small fray the moment you spot it. Catching trouble early keeps a quick fix from becoming a stranded afternoon.
Frequently Asked Questions
Can I fix a backpack water bottle pocket without sewing?
Yes, a few no-sew options handle light damage. Your best choice depends on the problem:
- Small mesh hole: patch it with strong gear repair tape on both sides
- Loose seam: bond the edges with a flexible fabric glue made for nylon
- Slack elastic: add a small cord lock or tie-off to cinch the opening
Seal any frayed edge first, and these quick fixes hold for everyday use.
What thread works best for mesh and nylon repairs?
Use bonded nylon or polyester upholstery thread, since both resist snapping under repeated flex and weight. Regular sewing thread is far too thin and tears loose quickly. Stitch with a tight backstitch and run the line into healthy fabric past the tear. For high-stress edges, double the stitch line so the strength spreads evenly and your repair holds through long days on the trail.
How do I keep nylon mesh from fraying further?
Seal every cut edge with heat. Pass a lighter flame quickly along the trimmed mesh until the fibers melt into a smooth, firm bead. Don’t hold the flame too long, or the nylon scorches and turns brittle. This melted edge stops the mesh from unraveling and gives your needle a stable surface. Reseal any spot that starts fraying again during your regular outdoor gear maintenance checks.
Why won’t my pocket hold a bottle snugly anymore?
The elastic binding along the opening has stretched out and lost its tension. Over time, sun, sweat, and repeated stretching wear it down. Replace it with a fresh piece cut slightly shorter than the opening so it pulls the pocket snug. Thread the new elastic through the binding channel, stitch both ends firmly, and test the stretch until your bottle gets a secure, comfortable hug.
Will a patched pocket hold up on long hikes?
A properly backed and stitched pocket handles regular trail use reliably. The key is a reinforcement patch that extends well past the damage, heavy-duty thread, and a doubled stitch line on stress points. Test it by jogging and twisting with a full bottle loaded before you head out. Add occasional outdoor gear maintenance, and your repaired pocket carries hydration confidently for many trips to come.
Conclusion
Fixing a blown-out pocket feels intimidating until you break it into simple steps. You’ve seen that success comes down to clean prep, careful alignment, and strong stitches placed exactly where the fabric flexes hardest.
Start by inspecting the damage and trimming the frayed edges, then clear out old thread, pin the seam, and stitch it tight. Back any hole with a reinforcement patch, restore the elastic binding for a snug grip, and test everything with a full bottle before you trust it on the trail. Respect those steps, sidestep the common mistakes, and your pocket will hold strong outing after outing.
A little regular care, like checking seams and rinsing out grit before each trip, keeps small snags from becoming bigger problems. Once you’ve mastered how to fix backpack water bottle pocket damage, you’ve gained a skill that protects your favorite pack, your hydration, and your wallet.
So gather your supplies, clear a flat surface, and get to work. Your backpack will be ready for the next adventure in no time.
1 thought on “How to Fix Backpack Water Bottle Pocket”