

Noticing your car’s clear coat starting to flake off can be incredibly frustrating. It often starts as a small white blister. Before you know it, that tiny spot turns into a massive, ugly patch.
You might be wondering how to repair peeling auto paint without spending a fortune. Taking your car to a professional auto body shop can easily cost hundreds, or even thousands, of dollars.
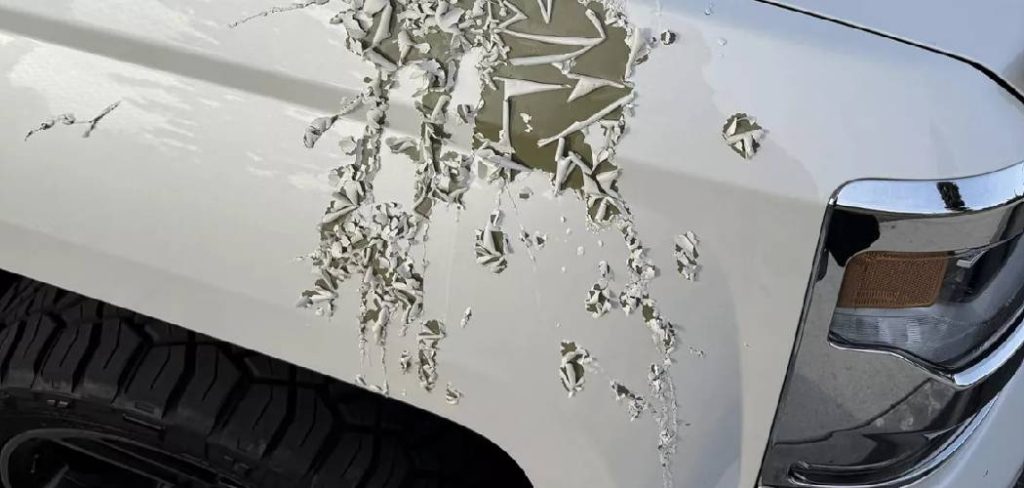
But here is the good news. Fixing this issue yourself is entirely possible, and it saves you serious money. You do not need to be a professional mechanic to get great results.
If you have a free weekend and a bit of patience, you can tackle this project. This guide will show you exactly what to do. We will walk through the entire process together, step by step.
What Causes This Problem?
Before we jump into the fix, it helps to understand why your paint is failing. Paint delamination, or peeling, usually happens when the clear coat separates from the base color layer.
Here are the most common culprits behind flaking car paint:
- Intense Sun Exposure: UV rays bake your car’s finish daily. Over time, this intense heat breaks down the chemical bonds in the clear coat.
- Harsh Contaminants: Bird droppings, tree sap, and road salt are highly acidic. If left unwashed, they eat right through the protective layers.
- Poor Previous Repairs: If a body shop did not prep the surface correctly during a past repair, the new paint will eventually lift and peel.
- Deep Scratches or Chips: A rock chip acts like a tiny open wound. Moisture gets under the clear coat and pushes it upward.
- Harsh Cleaning Chemicals: Using dish soap or cheap, abrasive cleaners strips away protective wax and weakens your paint over time.
Tools & Materials Needed
Having the right gear is half the battle. Gather these supplies before you start working. You can find all of these at your local auto parts store.
- Automotive masking tape and masking paper (or old newspapers)
- Microfiber towels and a clean wash mitt
- Wax and grease remover (or rubbing alcohol)
- Automotive sandpaper assortment (400, 800, 1000, and 2000 grit)
- A sanding block
- Automotive primer (aerosol spray can)
- Base coat paint matched to your car’s exact factory color code
- Automotive clear coat (aerosol spray can)
- Rubbing compound and polish
- Safety gear (respirator mask, safety glasses, nitrile gloves)
Step-by-Step Fix Guide: How to Repair Peeling Auto Paint at Home
Ready to get your hands dirty? Let’s dive into the process. Take your time with each step. Patience is the secret to a smooth, invisible repair.
Step 1: Wash and Prep the Area
You must start with a totally clean canvas. Dirt and grime will ruin your new paint job instantly.
Wash the peeling area and the surrounding panel with warm water and car soap. Rinse it thoroughly and dry it with a clean microfiber towel.
Next, apply your wax and grease remover. Wipe the area down carefully. This removes any invisible oils or leftover car wax that could prevent your new paint from sticking.
Step 2: Mask Off the Car
Overspray is your worst enemy during this project. Tiny paint particles can travel surprisingly far through the air.
Use your automotive masking tape and paper to cover the surrounding panels. Tape off headlights, windows, and trim pieces.
Make sure the tape edges are pressed down firmly. You only want the damaged area exposed to the elements.
Step 3: Sand Away the Peeling Paint
Now comes the most important part of learning how to repair peeling auto paint. You need to remove the failing clear coat completely.
Wrap a piece of 400-grit sandpaper around your sanding block. Begin sanding the peeling edges using gentle, circular motions.
Your goal is to smooth out the “step” between the good paint and the bare spot. Sand until you can run your finger over the edge without feeling a harsh bump.
Step 4: Refine the Sanded Edges
Once the flaking bits are gone, you need to smooth the surface further. Switch to your 800-grit sandpaper.
Wet the sandpaper slightly. Gently sand the entire area you just worked on. This removes the deep scratches left by the rougher 400-grit paper.
Wipe the area down with a damp microfiber cloth. The surface should look dull but feel incredibly smooth to the touch.
Step 5: Clean and Degrease Again
Sanding creates a massive amount of fine dust. If you paint over this dust, your new finish will look bumpy and terrible.
Take your wax and grease remover once more. Give the entire exposed area a very thorough wipe down.
Let the surface air dry completely. Do not touch the bare area with your bare hands, as the oils from your skin can cause issues.
Step 6: Apply the Automotive Primer
Primer acts as the glue that holds your new color to the car. Shake your primer spray can vigorously for at least one minute.
Hold the can about six to eight inches away from the surface. Spray a light, even coat over the sanded area using smooth, sweeping motions.
Let this first coat dry for about 10 minutes. Apply two more light coats, waiting 10 minutes between each one. Allow the final coat to dry for at least an hour.
Step 7: Lightly Sand the Primer
Even the best spray technique leaves a slight texture. You need to knock this down before adding color.
Take your 1000-grit sandpaper and wet it. Very gently wet-sand the dried primer until it feels as smooth as glass.
Wash away the primer dust with water and dry the area. Give it one final wipe with a tack cloth or grease remover.
Step 8: Apply Your Color Base Coat
This is where the magic happens. Make sure your base coat matches your car’s factory paint code exactly.
Shake the base coat can thoroughly. Apply a very thin, light coat over the primer. Do not worry if it looks a bit transparent at first.
Wait 10 to 15 minutes. Apply a second, slightly heavier coat. Overlap your strokes slightly to ensure even coverage.
Apply a third coat if necessary until the primer is completely hidden. Let the base coat dry completely for about 30 to 45 minutes.
Step 9: Apply the Clear Coat
The clear coat gives your car its glossy shine and protects the color underneath. This step requires a careful hand.
Shake the clear coat can well. Apply the first layer lightly. This is called a “tack coat” and gives the following layers something to grip.
Wait 10 minutes. Apply a second, wetter coat of clear. Move the can at a steady pace to avoid drips and runs.
Apply a third and final wet coat. The finish should look glossy. Let the entire repair cure for at least 24 to 48 hours in a dry, dust-free environment.
Step 10: Blend and Polish
After the clear coat has fully cured, it might look slightly duller than the rest of the car. This is totally normal for a DIY spray can job.
Wet your 2000-grit sandpaper. Very lightly sand the new clear coat to remove any “orange peel” texture or dust nibs.
Apply rubbing compound to a clean microfiber cloth or a polishing pad. Buff the area vigorously until the shine returns. Finish with a layer of high-quality car wax to protect your hard work.
Safety Warnings
Working with automotive paints and chemicals requires serious respect. Never take shortcuts with your health.
Always work in a well-ventilated area. A driveway or an open garage is perfect. Never spray paint in a closed, unventilated space.
You must wear a proper respirator mask. Paper dust masks will not stop harmful paint fumes from entering your lungs.
Protect your eyes with tight-fitting safety glasses. Wear nitrile gloves to keep harsh solvents and paint off your skin.
When to Call a Professional
While DIY repairs are great, they are not perfect for every situation. You have to know your limits.
If the peeling paint covers an entire hood or roof, skip the spray cans. Large, flat surfaces are nearly impossible to blend perfectly without professional spray guns.
If you discover deep rust holes under the peeling paint, call a pro. Metal fabrication and rust patching require welding skills and advanced bodywork knowledge.
Finally, if you drive a high-end luxury car, consider a body shop. Matching metallic or pearl tri-coat finishes perfectly is incredibly difficult for a beginner.
Cost Estimate
Fixing this yourself is an incredible way to keep cash in your pocket. Let us break down the rough numbers.
DIY Repair Cost:
Buying the sandpaper, masking supplies, primer, color-matched paint, and clear coat will cost between $50 and $100. If you need safety gear, add another $30. Total: roughly $80 to $130.
Professional Repair Cost:
A body shop will usually refuse to spot-repair a peeling panel. They will insist on stripping and repainting the entire panel. This typically costs between $500 and $1,200 depending on the shop and your car model.
By spending a Saturday in your driveway, you can easily save yourself close to a thousand dollars.
Frequently Asked Questions
Here are some of the most common questions people ask about fixing their car’s exterior finish.
Can I just spray clear coat over peeling paint?
No, you cannot. Spraying over a flaking surface will just trap the loose debris. The new clear coat will peel off immediately. You must sand the damaged area down to a smooth, solid base first.
How do I find my car’s exact paint code?
Check your driver’s side door jamb. There is usually a factory sticker there listing the exact alphanumeric paint code. You can also check your owner’s manual or under the hood.
Do I have to use primer if the base paint looks fine?
If you only sanded through the clear coat and the factory color is intact, you might not need primer. However, if you sanded down to bare metal or plastic, primer is absolutely mandatory.
How long will a DIY spray can paint job last?
If you prep the surface meticulously and use a high-quality 2K clear coat, a DIY repair can last for several years. Poor prep work will cause the repair to fail in a matter of months.
Why does my new paint look dull after drying?
Spray cans often lay down a slightly textured finish called “orange peel.” You simply need to wait for it to cure, wet-sand it with 2000-grit paper, and polish it with rubbing compound to restore the glossy shine.
Conclusion
Seeing your beloved car shed its outer layer is stressful, but it is not the end of the world. Now you know exactly how to repair peeling auto paint right in your own driveway.
By taking your time, prepping the surface thoroughly, and following these steps, you can restore your car’s look. You will also save a massive amount of money by skipping the professional body shop.
Remember, patience is your best tool. Do not rush the sanding, and respect the drying times between coats. You will be amazed at what you can accomplish with a few spray cans and some elbow grease.
Did this guide help you save your car’s paint job? We would love to hear about your DIY repair journey. Leave a comment below with your results, or subscribe to our newsletter for more weekly money-saving repair tips!