

A failing backflow preventer puts your water supply at risk. If your sprinklers spit, leak, or drip from the bonnet, the part is telling you it needs attention. The good news? You can fix it yourself. Learning how to repair Febco 765 saves you a service call and gets your irrigation system back online fast.
This pressure vacuum breaker is built to protect your drinking water from contamination. Over time, the internal seals wear, debris clogs the valve, and pressure drops. Most problems trace back to a worn poppet or a cracked seal—both simple swaps with a repair kit.
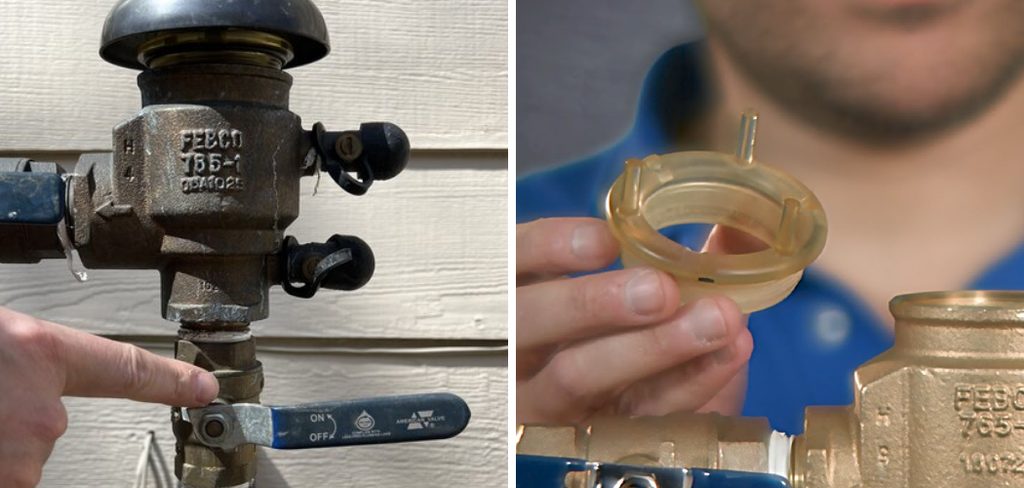
This guide walks you through the full repair, step by step, so you can diagnose the issue, replace the worn parts, and restore reliable backflow protection without hiring a technician.
Why Repairing Your Febco 765 Matters
Your backflow preventer is the barrier between clean water and contaminated water. When it fails, fertilizer, pesticides, and standing water from your irrigation system can siphon back into your home supply. That is a health hazard, not a minor leak.
A working pressure vacuum breaker also keeps your system efficient. Leaks waste water and inflate your bill. A continuous drip from the bonnet can lose hundreds of gallons a month.
Many areas legally require annual backflow testing. A failed unit means a failed inspection. Fixing it yourself keeps you compliant and avoids fines.
Learn this repair once and you control the timeline. No waiting days for a plumber. No emergency rates. You diagnose the problem, install the parts, and verify the fix on your own schedule.
Tools and Materials You’ll Need
Gather everything before you shut off the water. Stopping mid-repair to find a tool wastes time and patience.
- Febco 765 repair kit – matched to your valve size (½”, ¾”, or 1″)
- Adjustable wrench – for the bonnet and test cocks
- Flathead screwdriver – to lift the canopy and pry seals
- Channel-lock pliers – for stubborn fittings
- Clean rags – to catch water and wipe parts
- Bucket – to collect drainage
- Silicone grease – approved for potable water, to lubricate new seals
- Small brush or toothbrush – to clear debris from the valve body
- Safety glasses – pressurized water can spray
- Optional: a smartphone – snap photos as you disassemble so reassembly is foolproof
Buy the repair kit by model and size. The wrong kit means the wrong seals.
Step-by-Step Guide on How to Repair Febco 765
Step 1 – Shut Off the Water Supply
Locate the shutoff valves on the inlet and outlet sides of your unit. Turn both clockwise until they stop. This isolates the assembly and stops new water from entering.
Next, open the test cocks with your flathead screwdriver. You will hear a hiss as pressure escapes and water trickles out. Place your bucket underneath to catch the drainage.
Wait until the dripping stops completely. A pressurized assembly sprays the moment you loosen the bonnet, soaking you and your work area. Patience here keeps the job clean.
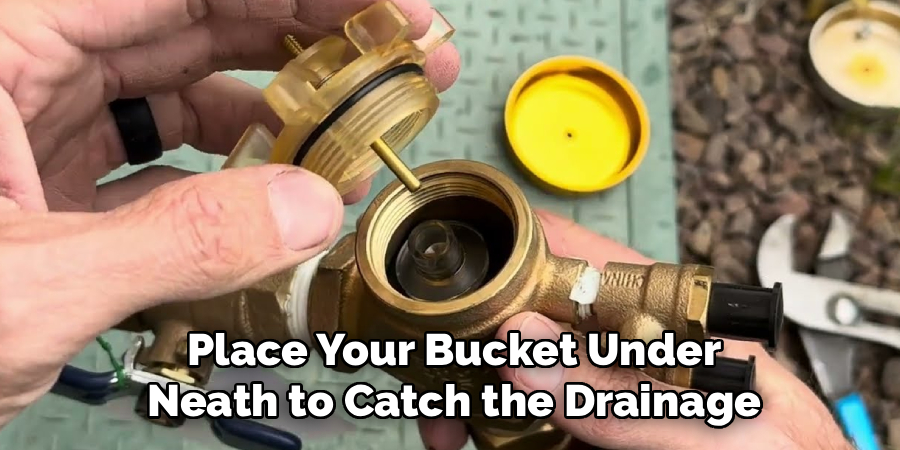
Run your hand near the test cocks. No flow means the pressure is gone. Now you are ready to open the valve safely and start the actual repair work.
Step 2 – Remove the Canopy and Bonnet
Find the plastic canopy on top of the assembly. Press the release tabs or lift it straight off with your flathead. Set it aside where it will not roll away.
Take your adjustable wrench to the bonnet—the large nut beneath the canopy. Turn it counterclockwise. It may resist at first, then break free with a sharp creak. Loosen it fully by hand once it spins easily.
Lift the bonnet straight up. Expect a small splash of trapped water. Snap a photo of the internal layout now. You will see the spring, the poppet, and the seals arranged exactly how they belong. That image becomes your reassembly map.
Step 3 – Inspect the Internal Components
Look inside the valve body. You are inspecting the check valve and the poppet assembly for wear, grit, and damage. Run your finger along the rubber seals—if they feel hard, cracked, or sticky, they are done.
Pull out the poppet and spring. Hold them up to the light. A healthy spring feels firm and springs back. A weak one stays compressed.
Check the seat where the poppet rests. Mineral deposits feel rough and chalky. Debris in this spot is the most common cause of a leaking unit.
Compare each old part against your repair kit. Lay them side by side. This confirms you have the right kit before you go any further.
Step 4 – Clean the Valve Body
Grab your small brush and a clean rag. Scrub the inside of the valve body to remove mineral scale, sand, and grime. You will feel grit lift away under the bristles.
Pay close attention to the valve seat. Any rough spot here stops the new poppet from sealing, and your leak returns. Wipe it until the surface feels smooth and clean.
Flush the body with a little water if your supply allows a quick burst. Watch for cloudy runoff—that is the trapped debris clearing out.
Dry everything with a fresh rag. A clean, dry surface helps the new seals seat properly and gives you a leak-free finish that lasts through the season.
Step 5 – Replace the Poppet and Seals
Open your repair kit and lay the new parts in order. Take the new poppet and seal first.
Apply a thin film of potable-water silicone grease to each rubber seal. This helps them slide into place and grip the seat without tearing. Skip the grease and the seals can pinch or fold.
Press the new poppet into the valve body. It should sit flush against the seat with no wobble. Seat the relief valve spring exactly where the old one came out—check your photo if you are unsure.
Line up the new bonnet seal around the rim. A misaligned seal here is the top cause of a repair that still drips. Take the extra moment to set it square.
Step 6 – Reassemble the Bonnet and Canopy
Lower the bonnet back onto the valve body. Keep it level so the seal does not twist. Thread it by hand first to avoid cross-threading the nut.
Once it spins freely, tighten with your adjustable wrench. Snug it firmly, but stop when you feel solid resistance. Overtightening cracks the plastic and crushes the seal.
Snap the canopy back into place over the bonnet. Listen for the click of the tabs locking in.
Give the whole assembly a gentle wiggle. Nothing should shift or rattle. A solid, quiet unit tells you the parts are seated. Now you are ready to bring the water back and test your work.
Step 7 – Restore Water and Test for Leaks
Close the test cocks with your screwdriver. Turn the inlet shutoff valve counterclockwise—slowly. Open it about halfway and let the assembly fill. You will hear water rushing in and the air pushing out.
Watch the bonnet and seals closely for thirty seconds. A bead of water forming anywhere means a seal is not seated. If you see one, shut off, drain, and recheck Step 5.
Once the inlet holds steady, open the outlet valve fully. Then open both shutoffs all the way.
Run your dry hand around every joint. Damp fingers point you straight to the problem spot. A clean, dry assembly means your repair held.
Step 8 – Run a Full System Check
Turn on your irrigation system and let it cycle through a zone or two. Stand by the assembly and watch the bonnet under live pressure.
A properly working pressure vacuum breaker stays dry and quiet during operation. Listen for hissing or watch for spray—both signal a seal that needs another look.
Check the test cocks one more time. They should be snug with no weeping around the threads.
Walk your sprinkler zones. Confirm steady spray and normal pressure at the heads. Weak output can mean trapped air, which clears after a minute of running. This final check confirms your backflow protection is back to full strength.
Critical Mistakes When Repairing a Febco 765
Most failed repairs come down to a handful of avoidable errors. Know them before you start.
The biggest mistake is skipping the pressure release. People loosen the bonnet on a live assembly and get blasted with high-pressure water. Always open the test cocks and drain the unit fully before touching the bonnet. No exceptions.
The second mistake is buying the wrong repair kit. The 765 comes in multiple sizes, and the seals differ between them. Measure your valve and match the kit to the size before you disassemble anything. A mismatched seal will never hold.
Third, many people reuse old seals or skip the silicone grease. Worn rubber is the reason your unit failed in the first place. Replace every seal in the kit, and lubricate each one with potable-water-safe grease so it seats cleanly.
Fourth, overtightening the bonnet cracks the plastic housing. Hand-tighten first, then add a firm quarter-turn with the wrench. Stop at solid resistance.
Finally, people forget to clean the valve seat. A rough or scaled seat stops the new poppet from sealing, and the relief valve keeps leaking. Scrub it smooth before you install new parts.
Expert Tips
Do this repair in spring, before you fully charge your irrigation system. You catch winter freeze damage early and avoid a mid-season failure.
Keep a spare repair kit on the shelf. When a seal fails, you fix it the same day instead of waiting on a parts run.
Photograph each step as you disassemble. Reassembly becomes a simple reverse of your photo trail, and you never guess where the spring belongs.
Insulate the assembly before the first freeze. A cracked bonnet from frozen water is the most expensive failure on this unit, and it is fully preventable.
Finally, run a quick visual check monthly during watering season. A two-minute glance at the bonnet catches a small drip before it becomes a flood. Early detection saves both water and parts.
Frequently Asked Questions
How often should I replace the seals on my Febco 765?
Replace the internal seals every two to three years under normal use. Hard water, sediment, and freeze cycles wear them faster. Watch for these signs:
- Water dripping from the bonnet during operation
- Reduced pressure at your sprinkler heads
- A failed annual backflow test
If you spot any of these, swap the seals right away to keep your backflow protection reliable.
Can I use a generic repair kit instead of the Febco kit?
Use the genuine Febco kit matched to your valve size. Generic seals often have slightly different dimensions, and even a small mismatch causes leaks or improper seating. The factory kit includes the correct poppet, springs, and seals for your exact model. The few extra dollars buy you a repair that actually holds.
Why does my unit leak only when the sprinklers run?
A leak under pressure points to a worn poppet or a damaged check valve seal. When the system is off, low pressure hides the flaw. Once water flows, the pressure forces water past the failing seal and out the bonnet. Replace the poppet and seals, and clean the valve seat to fix it.
Do I need to shut off my whole house water to make this repair?
No. The assembly has its own inlet and outlet shutoff valves. Close both, open the test cocks to drain the unit, and you can work without touching your main supply. Your household water stays on the entire time. Just confirm pressure is fully released before you open the bonnet.
Will a freeze damage my pressure vacuum breaker?
Yes. Trapped water expands when it freezes and cracks the bonnet or splits the body. Before the first hard freeze, shut off the supply, drain the unit through the test cocks, and insulate it with a cover or foam. This single step prevents the most common—and most expensive—failure on these units.
Conclusion
Fixing your own backflow preventer is well within reach. You shut off the water, open the unit, clean the valve seat, swap the worn poppet and seals, and test for leaks. Each step builds on the last, and none of it requires a plumber.
The payoff is real. You protect your drinking water, pass your annual inspection, and keep your irrigation system running without wasting water on a hidden drip. You also control the timeline—no service fees, no waiting.
Take your time on the details that matter: release the pressure first, match the repair kit to your size, replace every seal, and tighten the bonnet just enough. Get those right and your unit runs leak-free for years.
Knowing how to repair Febco 765 1 puts you in charge of your home’s water safety. Keep a spare kit on hand, check the assembly monthly during watering season, and insulate it before winter. Do that, and you will rarely face a surprise failure again.