

Has your favorite wall clock stopped telling the right time, even though it still ticks away? Often, the trouble isn’t the motor at all. It’s the hands. Bent, loose, or stuck clock hands are one of the most common reasons a clock acts up, and they’re surprisingly easy to fix at home.
Maybe the minute hand catches on the hour hand, or one hand spins freely without moving the others. Whatever the symptom, you don’t need a professional or a workshop full of tools. With a steady hand and a little patience, you can repair clock hands yourself in under an hour. This guide walks you through the entire process how to repair clock hands, step by step, so you can get your clock keeping accurate time again.
Why Learning Clock Hand Repair Matters
A clock that runs but shows the wrong time is more than annoying. It throws off your routine and makes a tidy room feel neglected. Learning to fix the hands yourself saves money, since clock repair shops often charge more than the clock is worth.
For homeowners, it keeps beloved timepieces and heirlooms ticking for years. For renters, it’s a quick fix that needs no permanent changes or special permission. And for DIY beginners, it builds real confidence working with small, delicate mechanisms.
There’s a bonus for campers and outdoor lovers, too. The same careful skills, aligning small parts, handling tiny fasteners, and making gentle adjustments, carry straight over to fixing camp lanterns, compasses, and battery-powered gear. Once you understand how clock hands sit and move, you’ll spot the same friction-fit logic in dozens of other small repairs.
Tools and Materials You’ll Need
Gather everything before you start, because hunting for a tiny tool mid-repair is a fast way to lose a part. Here’s what to keep within reach:
- Needle-nose pliers – for gripping and gently bending hands back into shape
- Tweezers – to handle small hands without smudging or scratching them
- A small flathead screwdriver – for prying off the hand nut and loosening hands
- Replacement hands – matching length and fit, in case yours are too damaged
- A soft cloth – to protect the dial face while you work
- A fresh battery – for quartz movements, so you can test as you go
- Clean, lint-free gloves – to keep fingerprints off the dial and hands
- A small magnifying glass (optional) – handy for spotting tiny alignment issues and reading the spindle clearly
Lay it all out on a clean, well-lit surface.
Step-by-Step Guide on How To Repair Clock Hands
Step 1 – Diagnose the problem first
Before you touch anything, watch the clock closely for a minute or two. Notice which hand misbehaves. Does the minute hand stick? Does the hour hand wobble? Does one hand drag against another with a faint scraping sound?
Look for hands that touch or overlap as they sweep around the dial face. A tiny bend can cause two hands to rub, stopping the clock cold. Listen, too. A steady tick usually means the clock movement is fine and the hands are your culprit.
Jot down what you see. Knowing exactly which hand fails, and how, tells you whether you need to straighten, reseat, or replace a part. This quick diagnosis saves you from taking apart more than you need.
Step 2 – Remove the clock from the wall
Lift the clock off the wall and set it face-up on your soft cloth. Working on a flat, padded surface protects the dial face and keeps small parts from rolling away.

Find a calm, well-lit spot, like a kitchen table near a window. Good light makes a huge difference when you’re squinting at a thin second hand or a tiny hand nut.
If your clock has a glass cover or bezel, gently remove it now. Most pop off or unscrew with light pressure. Set it aside somewhere safe. With the hands fully exposed, you’ll have clear access to work, and you’ll instantly feel more in control of the repair ahead.
Step 3 – Take off the hands carefully
Now remove the hands so you can inspect them. Start with the second hand, which usually pulls straight off the thin central shaft with gentle tweezers.
Next comes the hand nut, the tiny fastener holding the minute hand in place. Loosen it counterclockwise with your fingers or a small screwdriver. Once it’s off, lift the minute hand, then the hour hand, which simply sits on the spindle by friction fit.
Work slowly and keep each piece in order on your cloth. You’ll feel how lightly these parts grip the shaft. Don’t yank them. A steady, even pull is all it takes. Keeping them organized makes reassembly far smoother later.
Step 4 – Straighten any bent hands
Lay each hand flat on your cloth and check it against the light. Even a slight bend casts a tiny shadow that gives it away. Bent hands are the number-one cause of a stuck clock.
Hold the hand gently with needle-nose pliers and ease it back to flat with light, patient pressure. Push too hard and you’ll crease the thin metal, so work in small movements.
Run a finger lightly along the length to feel for high spots. The hand should lie perfectly flat with no curl or twist. Take your time here. A truly straight hand glides freely without catching on its neighbors, which is exactly what you want before reassembly.
Step 5 – Clean the shaft and hands
While everything’s apart, give the parts a quick cleaning. Dust and grime build up around the central shaft and spindle, adding friction that slows or stops the hands.
Wipe each hand with a dry, lint-free cloth. For stubborn grime near the spindle, dampen the cloth very lightly, then dry it right away. Avoid soaking anything, since moisture near the clock movement causes rust.
Blow gently across the shaft to clear loose dust, or use a soft brush. You’ll notice the surfaces look brighter and cleaner. This small step pays off, because clean parts move smoothly and sit tighter when you put them back. A clean shaft also helps the hands grip at the right depth.
Step 6 – Reattach the hands in order
Now rebuild from the bottom up. Slide the hour hand onto the spindle first, pressing it down to its friction fit and pointing it straight up to twelve.
Next, place the minute hand on the central shaft and point it to twelve as well. Both hands aligned at twelve give you a clean reference for setting the time later. Thread the hand nut back on and tighten it gently, just snug, not forced.
Finally, push the second hand onto its thin shaft. Spin each hand by hand to confirm none of them rub. This careful order is the heart of how to repair clock hands, since proper layering prevents the hands from touching as they turn.
Step 7 – Check and fix alignment
Alignment is everything. With all hands on, look straight down at the dial face and confirm each hand sits at a slightly different height. They should never scrape against each other or the glass.
Gently lift or lower a hand on its shaft if it sits too close to another. A hair of space between each one keeps them gliding freely. Turn the minute hand a full circle and watch it pass the hour hand without contact.
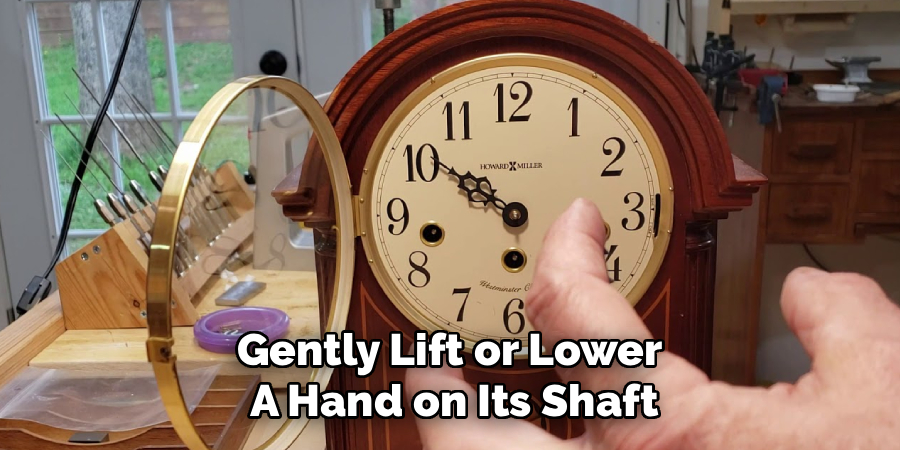
Listen for any faint tick of metal on metal, which signals a snag. Nudge the offending hand until the sound disappears. Proper alignment is the difference between a clock that runs forever and one that stalls within hours.
Step 8 – Test the movement and set the time
Pop a fresh battery into the battery compartment, or wind the clock if it’s mechanical. Watch the second hand begin its sweep. A smooth, steady motion means the quartz mechanism and hands are working together nicely.
Let it run for several minutes. Confirm the minute hand advances and the hour hand creeps along without sticking. If everything moves freely, set the correct time using the small wheel on the back.
Hang the clock back up and step away. Check it again in an hour to be sure it keeps accurate time. When the hands glide without a hitch, you’ve successfully completed the repair. Enjoy the quiet satisfaction of a clock that finally tells the right time.
Critical Mistakes When Repairing Clock Hands
The most common mistake is forcing the hands on or off. These parts grip by a light friction fit, so yanking hard bends them instantly or snaps the delicate shaft. Always pull straight and steady, and stop the moment you feel real resistance.
Another frequent error is over-tightening the hand nut. Beginners crank it down hard, thinking tighter means more secure. In truth, an over-tight nut presses the hands together and causes them to drag. Snug is plenty. The nut only needs to hold the minute hand gently in place.
Many people also skip checking alignment. They reattach the hands flat and call it done, only to find the clock stalls within an hour because two hands touch. Always confirm each hand sits at its own height with a sliver of space between them.
Touching the hands with bare, oily fingers is another slip. Skin oils leave smudges and invite corrosion over time, especially on a polished second hand. Use gloves or tweezers to keep them clean.
Finally, folks often misjudge replacement hands. Buying the wrong length or shaft size leaves you with hands that don’t fit or won’t reach the dial markings. Measure carefully before you order.
Expert Tips
Always start by aligning every hand to twelve before you set the time. This gives you a clean, reliable reference and makes spotting alignment problems far easier.
Keep a small dish nearby for the hand nut and tiny parts. These pieces love to roll off the table and vanish into carpet, and they’re tough to replace.
When buying replacement hands, take your old ones to the store or measure the shaft diameter precisely. A mismatched fit is the top reason repairs fail.
Work in bright, natural light whenever you can. A thin second hand is hard to judge under dim bulbs, and good lighting reveals bends you’d otherwise miss.
Finally, snap a quick photo before you disassemble anything. If you forget the order or angle of the hands, that picture becomes your perfect cheat sheet for reassembly.
Frequently Asked Questions
Why do my clock hands keep getting stuck?
Stuck hands usually come down to one of a few simple causes. The most common culprits are:
- A slight bend causing two hands to rub
- An over-tight hand nut pressing the hands together
- Dust and grime around the central shaft
Check alignment first, then loosen the nut slightly and clean the shaft. Nine times out of ten, one of these fixes frees the hands right up.
Can I replace just one clock hand instead of all of them?
Yes, you can replace a single hand if the others are fine. Just make sure the new hand matches the length, style, and shaft fit of the original. Mismatched hands look odd and may not align properly. If you can’t find an exact match, replacing the full set keeps everything consistent and ensures a clean, even fit on the spindle.
How do I know if the problem is the hands or the movement?
Listen and watch closely. If the clock ticks steadily but the time stays wrong, the hands are likely your issue. If the ticking stops entirely or sounds irregular, the clock movement may be failing. Try removing the hands and running the bare movement. If it turns freely, your hands need attention, not the motor.
Do I need special tools to fix clock hands?
Not really. Most repairs need only basic household tools, like needle-nose pliers, tweezers, and a small screwdriver. A soft cloth protects the dial face, and a magnifying glass helps with tiny parts. You won’t need anything specialized unless you’re replacing the entire movement. For most loose, bent, or misaligned hands, simple tools and a steady hand are all it takes.
Why does my clock run but show the wrong time?
This almost always points to loose or slipping hands rather than a broken motor. If the hand nut is too loose, the minute hand spins without the gears moving it correctly. Tighten it gently to a snug fit, then reset the time. If a hand sits loose on its friction fit, press it down firmly so it grips the shaft properly.
Conclusion
Bringing a tired clock back to life is more about patience than skill. Start by diagnosing which hand misbehaves, then remove the hands carefully, straighten any bends, and clean the shaft. Reattach everything from the hour hand up, check that each hand sits at its own height, and test the movement with a fresh battery before setting the time.
The real secret to a lasting fix is gentle handling and careful alignment. Hands grip by a light friction fit, so easy pressure and a snug, never over-tight, hand nut keep them gliding for years. A little space between each hand makes all the difference between a clock that runs forever and one that stalls by morning.
You don’t need a repair shop or fancy gear to repair clock hands and get accurate time back on your wall. With a steady hand and an hour to spare, you can do it yourself and feel genuinely proud. Next time a clock starts slipping, grab your tools, find good light, and fix it with confidence.