

Is your fridge warm, but the light still turns on? You might be dealing with a faulty compressor. When a fridge stops cooling, most people panic and assume they need a brand-new appliance. But learning how to repair refrigerator compressor issues can save you hundreds of dollars.
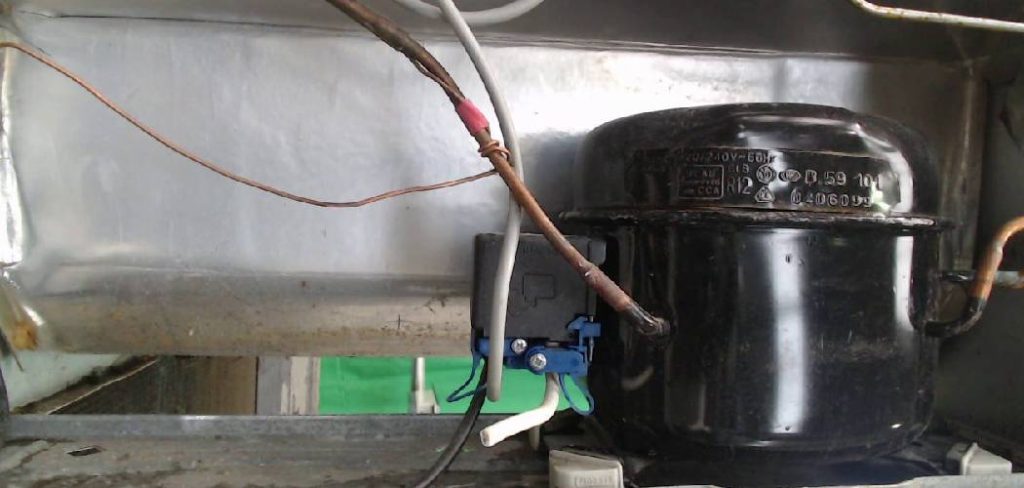
As a homeowner, you have the power to troubleshoot and fix many common cooling problems yourself. Often, the issue is not the heavy metal compressor tank itself, but the small parts attached to it. By taking a few hours to diagnose the problem, you keep your hard-earned cash in your wallet. Grab your tools, and let us walk through this simple DIY repair together.
What Causes Refrigerator Compressor Problems?
Compressors rarely fail out of nowhere. Usually, a smaller component breaks down and stops the compressor from running.
Here are five common causes of compressor failure:
- Faulty Start Relay: This small part tells the compressor to turn on. If it fails, the compressor simply will not start.
- Bad Overload Protector: This safety device stops the compressor from overheating. If it breaks, the system shuts down completely.
- Dirty Condenser Coils: Dust buildup forces your compressor to work overtime. Eventually, it overheats and shuts off to protect itself.
- Power Surges: A sudden spike in electricity can fry the delicate electrical components attached to your compressor.
- Low Refrigerant: If your fridge has a leak, the compressor runs constantly trying to cool the air, leading to eventual burnout.
Tools & Materials Needed
Before we start, you need to gather the right gear. Having everything within reach makes the job fast and frustration-free.
You will need the following tools to complete this job:
- Digital multimeter (essential for testing electrical parts)
- Screwdriver set (Phillips and flathead)
- Needle-nose pliers
- Safety gloves and goggles
- A small brush or vacuum (for cleaning dust)
- Replacement start relay and overload protector (once you confirm the part number)
Step-by-Step Fix Guide: How to Repair Refrigerator Compressor Systems
Replacing the actual sealed metal compressor tank requires handling chemical refrigerants. By law, that specific job requires a licensed professional.
However, 90% of “dead compressor” issues are actually just bad start relays or overload protectors. We can easily test and replace those parts right now. Here is your beginner-friendly guide to getting your fridge running again.
Step 1: Disconnect the Power
Safety always comes first when working with major appliances. Never skip this step. Pull the refrigerator away from the wall carefully. Unplug the main power cord from the wall outlet.
Step 2: Locate the Compressor
Go to the back of your refrigerator. Look near the bottom for a large, black, football-sized metal tank. This black tank is your compressor. You will notice a small plastic box or cover attached to the side of it.
Step 3: Remove the Access Cover
Take your flathead screwdriver and carefully pry off the plastic cover on the side of the compressor. Some covers might use a wire clip to hold them in place. Under this cover, you will see the start relay and the overload protector plugged into the side of the compressor tank.
Step 4: Remove the Starter Relay and Overload Protector
Take a quick picture with your phone so you remember where the wires go. Gently pull the start relay and overload protector straight off the metal pins on the compressor. Use your needle-nose pliers to carefully disconnect the wires attached to these parts.
Step 5: Test the Start Relay
Now we play detective. Shake the start relay gently near your ear. If it rattles like a broken lightbulb, the internal ceramic piece has shattered. You have found your problem, and you just need a new relay!
If it does not rattle, grab your multimeter. Set it to the lowest Ohms setting for testing continuity. Place the multimeter probes into the two main holes on the relay. If you get a reading of zero or infinity, the relay is completely dead and needs replacing.
Step 6: Test the Compressor Pins
Let us make sure the heavy metal compressor itself is still healthy. Look at the side of the tank where you pulled off the relay.
You will see three metal pins arranged in a triangle. Take your multimeter and test the resistance between each pair of pins.
You should get a low electrical reading between all three combinations. If any combination shows an open circuit (infinity), the internal motor is blown.
Step 7: Install the Replacement Parts
If your compressor pins tested fine, but your relay or overload protector failed, you are in luck. Buy the exact replacement parts based on your refrigerator model number.
Push the wire connectors onto the new start relay and overload protector. Match them to the photo you took earlier.
Carefully push the new parts back onto the three metal pins on the side of the compressor. Snap the plastic cover back into place.
Step 8: Clean the Coils and Restart
Before plugging the fridge back in, grab your vacuum. Clean all the dust off the black condenser coils near the compressor.
Plug the refrigerator back into the wall outlet. You should hear a soft click, followed by a steady hum as the compressor starts up.
Safety Warnings for Appliance Repair
Working with appliances requires respect for electricity. Always double-check that the fridge is unplugged before touching any wires.
Never cut copper pipes or tubing attached to the compressor. These contain pressurized refrigerant gas that can cause frostbite or vision loss.
Wear gloves to protect your hands from sharp metal edges on the back panel. If you smell a strong chemical odor, stop working and ventilate the room immediately.
When to Call a Professional
Sometimes, a repair goes beyond basic DIY troubleshooting. It is important to know your limits to keep your home safe.
If your start relay and overload protector test perfectly fine, but the compressor still will not start, the internal motor might be locked up.
If your compressor runs constantly but the fridge stays warm, you likely have a sealed system leak. Both of these scenarios require a licensed technician to safely recover and recharge the refrigerant gas.
Cost Estimate: DIY vs. Professional Repair
Fixing a fridge yourself is one of the most rewarding ways to save money. The price difference is quite staggering.
If you fix it yourself, a new start relay or overload protector costs between $15 and $40. That is your entire out-of-pocket cost.
If you call a professional, expect to pay a $100 diagnostic fee just for them to walk through the door. Having them replace the relay will easily total $200 to $300.
If the sealed compressor tank actually needs replacing, a professional repair runs between $600 and $1,200. At that price, buying a new refrigerator makes more sense.
Frequently Asked Questions
How do I know if my refrigerator compressor is bad?
If your fridge is warm and strangely silent, the compressor is likely not running. Alternatively, if it makes loud clicking noises every few minutes without starting, the start relay is failing.
Can a refrigerator compressor be repaired instead of replaced?
The sealed metal compressor tank itself cannot be repaired; it must be replaced. However, the external starting components (relays and protectors) can easily be replaced by a DIYer.
How much does it cost to replace a compressor start relay?
You can buy a replacement start relay online or at an appliance parts store for roughly $15 to $40. It takes about twenty minutes to install yourself.
Why does my fridge click but not cool?
The clicking sound is the overload protector shutting down the system. It does this because a bad start relay is failing to give the compressor the necessary power boost to turn on.
Conclusion
Knowing how to repair refrigerator compressor issues empowers you to handle household emergencies with confidence. You do not always have to wait for a costly technician to save your groceries.
By checking the start relay, testing the overload protector, and keeping your coils clean, you can easily extend the life of your appliance. A simple $20 part is often all it takes to get things chilling again.
Are you ready to tackle more household fixes and save even more money? Bookmark our website for more easy, step-by-step DIY repair guides!