

Accidents happen to the best of us. You might be moving a heavy piece of furniture down the hallway.
Suddenly, the corner catches the bedroom door. Now you are staring at an ugly, jagged hole.
If you are wondering how to repair hole in hollow door, you are in the right place. You do not need to replace the entire door right away.
Replacing an interior door is expensive and time-consuming. You have to measure the hinges, match the hardware, and paint the new wood.
Fixing it yourself is incredibly rewarding. It saves you a significant amount of money.
Plus, this is a repair anyone can tackle over a weekend. You just need a few basic supplies and some patience.
Grab your tool belt, and let us get that door looking brand new again.
What Causes This Problem?
Hollow core doors are lightweight and affordable. This makes them incredibly popular in homes and apartments everywhere.
However, they are basically made of thin wood veneers over a cardboard honeycomb core. Because of this fragile design, they dent and puncture very easily.
Here are the most common culprits behind hollow door damage:
- Moving Furniture: Sharp corners of heavy dressers or desks easily punch through thin door panels.
- Doorknob Impacts: When a door swings open too fast, the knob from an adjacent door can strike it.
- Roughhousing: Kids playing indoors or pets jumping can accidentally crack the thin wood.
- Flying Objects: Tossed toys, baseballs, or shoes can easily puncture the surface.
- General Wear and Tear: Over time, repeated bumps from laundry baskets or vacuum cleaners weaken the material.
Tools & Materials Needed Before Starting
You want to gather all your supplies before you start working. Running to the hardware store halfway through a project is frustrating.
You can find all of these items at your local home improvement store. Many of them might already be sitting in your garage.
Here is your complete shopping list:
- Utility Knife: For trimming away the jagged edges of the broken wood.
- Paper Towels or Newspaper: To stuff inside the hollow core to create a backing.
- Expanding Foam (Low Expansion): This fills the void and creates a solid base for your filler.
- Auto Body Filler (like Bondo) or Spackle: For filling the actual hole and creating a smooth surface.
- Putty Knife: A flexible plastic or metal blade to apply the filler smoothly.
- Sandpaper: You will need both medium-grit (120) and fine-grit (220) blocks.
- Primer: To seal the repaired area before painting.
- Matching Paint: Get the exact color and sheen of your current door.
- Paintbrush or Small Roller: To blend the new paint flawlessly.
- Drop Cloth: To protect your floors from dust and dripping foam.
Step-by-Step Fix Guide: How to Repair Hole in Hollow Door
Repairing your door might seem intimidating at first. Do not worry, we are going to break it down into easy, bite-sized steps.
Follow this guide closely. Your guests will never know there was a hole in the first place.
Step 1: Prep the Area and Protect Your Floors
First, lay out your drop cloth directly under the damaged door.
Expanding foam and auto body filler can make a serious mess. They are very difficult to remove from carpet or hardwood.

You can leave the door on its hinges for this project. If you prefer working flat, you can take it down and lay it across two sawhorses.
Step 2: Clean Up the Jagged Edges
Look closely at the hole. You will likely see splintered pieces of wood pointing inward and outward.
Take your utility knife and carefully slice away the loose, jagged edges.
You want to create a clean, slightly beveled edge around the puncture. This helps the filler bond better to the wood.
Wipe away any dust with a damp rag.
Step 3: Create a Backing Inside the Door
Remember, your door is hollow inside. If you just apply filler, it will fall straight into the bottom of the door.
Take a few paper towels or crumpled pieces of newspaper.
Push them gently into the hole using your fingers or the handle of your putty knife.
Pack them tightly around the perimeter of the hole inside the door. This creates a little nest or backing for the expanding foam.
Step 4: Apply the Expanding Foam
Shake your can of low-expansion spray foam vigorously.
Insert the nozzle slightly into the hole and pull the trigger.
Fill the hole about 80 percent of the way full. The foam will expand as it cures.
Let the foam sit completely undisturbed until it dries hard. This usually takes a few hours, but check your specific can for exact drying times.
Step 5: Slice Off the Excess Foam
Once the foam is completely hard, it will probably look like a mushroom popping out of your door.
Take your utility knife and extend the blade fully.
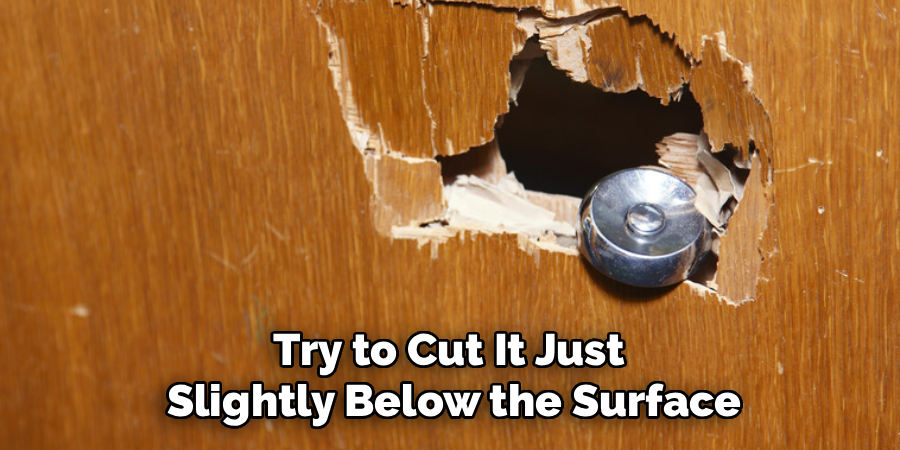
Carefully slice the excess foam flush with the surface of the door.
Actually, try to cut it just slightly below the surface of the door wood. This leaves room for your smooth filler.
Step 6: Apply the Auto Body Filler
Mix your auto body filler or prepare your spackle. Auto body filler dries very fast and very hard, making it ideal for doors.
Scoop a golf-ball-sized amount onto your putty knife.
Press the filler firmly into the hole, swiping it smoothly across the surface.
Leave a slight mound of filler over the hole. It will shrink just a tiny bit as it dries, and you will sand it down anyway.
Step 7: Sand It Smooth
Wait for the filler to dry completely. It should feel rock-hard to the touch.
Take your medium-grit (120) sandpaper and sand down the bulk of the excess filler.
Once it is mostly flat, switch to your fine-grit (220) sandpaper.
Sand the area until it is perfectly flush and smooth with the rest of the door. Run your hand over it; you should not feel any bump or dip.
Step 8: Prime and Paint
Wipe away all the sanding dust with a slightly damp cloth. Let the door dry.
Apply a coat of high-quality primer over the patched area. Primer seals the filler so it does not absorb your paint unevenly.
Once the primer is dry, paint over the area using your matching door paint.
Feather the edges of your paint outward using a small roller. This helps blend the new paint seamlessly with the old paint.
You might need two coats for a flawless finish.
Safety Warnings for Door Repair
Safety should always come first when doing home repairs. This project uses some strong chemicals and sharp tools.
Keep these important safety tips in mind:
- Wear Gloves: Auto body filler and expanding foam stick aggressively to skin. Always wear disposable nitrile gloves.
- Protect Your Eyes: Wear safety glasses when slicing the foam or sanding. You do not want toxic dust falling into your eyes.
- Ventilate the Room: Primer, paint, and body filler emit strong fumes. Open a window or turn on a fan to keep fresh air circulating.
- Handle Knives Carefully: Always cut away from your body when using the utility knife to trim edges or foam.
When to Call a Professional
DIY repairs are incredibly rewarding. However, there are limits to what a quick patch job can handle.
You should always be honest with yourself about your comfort level.
If the hole is massive—say, larger than a dinner plate—patching it might compromise the door’s structural integrity.
If the door is severely splintered near the hinges or the doorknob, a patch will not hold up to daily use.
Additionally, if your door has deep, intricate wood grain or custom paneling, a flat patch will look incredibly obvious.
In these cases, calling a professional carpenter or simply buying a replacement door is your best bet.
They have the skills to match complex textures or safely install a brand new door frame.
Cost Estimate: DIY vs. Pro Repair
One of the biggest reasons to learn this skill is the money you will save. Let us look at the numbers.
If you fix it yourself, your materials will cost very little.
Expanding foam, filler, sandpaper, and a small can of paint will run you roughly $30 to $50.
If you already have some of these tools in your garage, your cost is almost zero.
Hiring a professional handyman is a different story.
A pro will typically charge a minimum call-out fee just to show up at your house.
For the labor and materials, you can expect to pay anywhere from $100 to $200 for a repair.
If the professional decides the door needs replacing, costs skyrocket. A new door, plus installation and painting, easily costs $250 to $400.
Doing it yourself keeps that money right in your pocket.
FAQs About How to Repair Hole in Hollow Door
People often have specific questions before they cut into their doors. We have gathered the most common queries right here.
Can I just use wood putty instead of expanding foam?
Wood putty is great for tiny scratches or nail holes. However, for a large puncture, putty will just fall into the hollow cavity. You need the expanding foam to create a solid base first.
Does it matter what kind of spray foam I use?
Yes! You must use “low-expansion” spray foam, often labeled for windows and doors. High-expansion foam expands so forcefully it can bow or split your door in half.
How do I match the paint color exactly?
Take a sharp knife and peel a tiny flake of paint off the door. Take that flake to your local paint store. They use a computer to color-match it perfectly.
What if my door has a faux wood grain texture?
This is tricky. You can apply the filler as usual. Before it dries completely, drag a stiff-bristled brush or a wood-graining tool over the wet filler to mimic the texture.
Can I fix a hole on both sides of the door?
Yes, you can. You will just need to pack the paper towels securely into the middle to support the foam. Then repeat the filling and sanding process on both sides.
Conclusion
Seeing a jagged break in your interior woodwork is definitely frustrating. Now you know exactly how to repair hole in hollow door without breaking a sweat.
By following these simple steps, you can save hundreds of dollars. You also get the satisfaction of mastering a new DIY skill.
Remember to take your time, let the filler dry completely, and sand it perfectly flush. Your door will look as good as new in just a single weekend.
Are you ready to tackle more projects around the house? Bookmark our website for more easy, money-saving repair guides, and let us fix it together!